Authentication
This doc assumes you're storing your pages/styles/etc. in a directory called src, and you have the baseUrl option set to src in your tsconfig.json for importing modules from the root.
Authentication can be a cumbersome process when building headless WordPress sites. Thankfully, Faust.js takes care of all your authentication needs in your Next.js application.
How It Works
TL;DR: Authentication in Faust.js can happen in five main steps:
- User initiates request to authenticate data.
- Faust.js facilitates the request for an authorization code from the FaustWP plugin. This code is a short-lived token used to request a refresh and access token.
- Faust.js facilitates a refresh and access token request from the FaustWP plugin using the authorization code.
- Faust.js stores the refresh token in a secure, HTTP-only cookie. The token refresh requests a new access token when the current one expires
- Faust.js stores the access token in memory that you can use in subsequent authenticated requests.
Initial Setup
Before you get started with implementing an authentication strategy, you'll need to setup the API Router. You can do this by creating a file, src/pages/api/faust/[[...route]].ts, with the following code:
import 'faust.config';
import { apiRouter } from '@faustjs/core/api';

export default apiRouter;
Strategies
There are two authentication strategies available in Faust.js: redirect and local.
Redirect Based Authentication
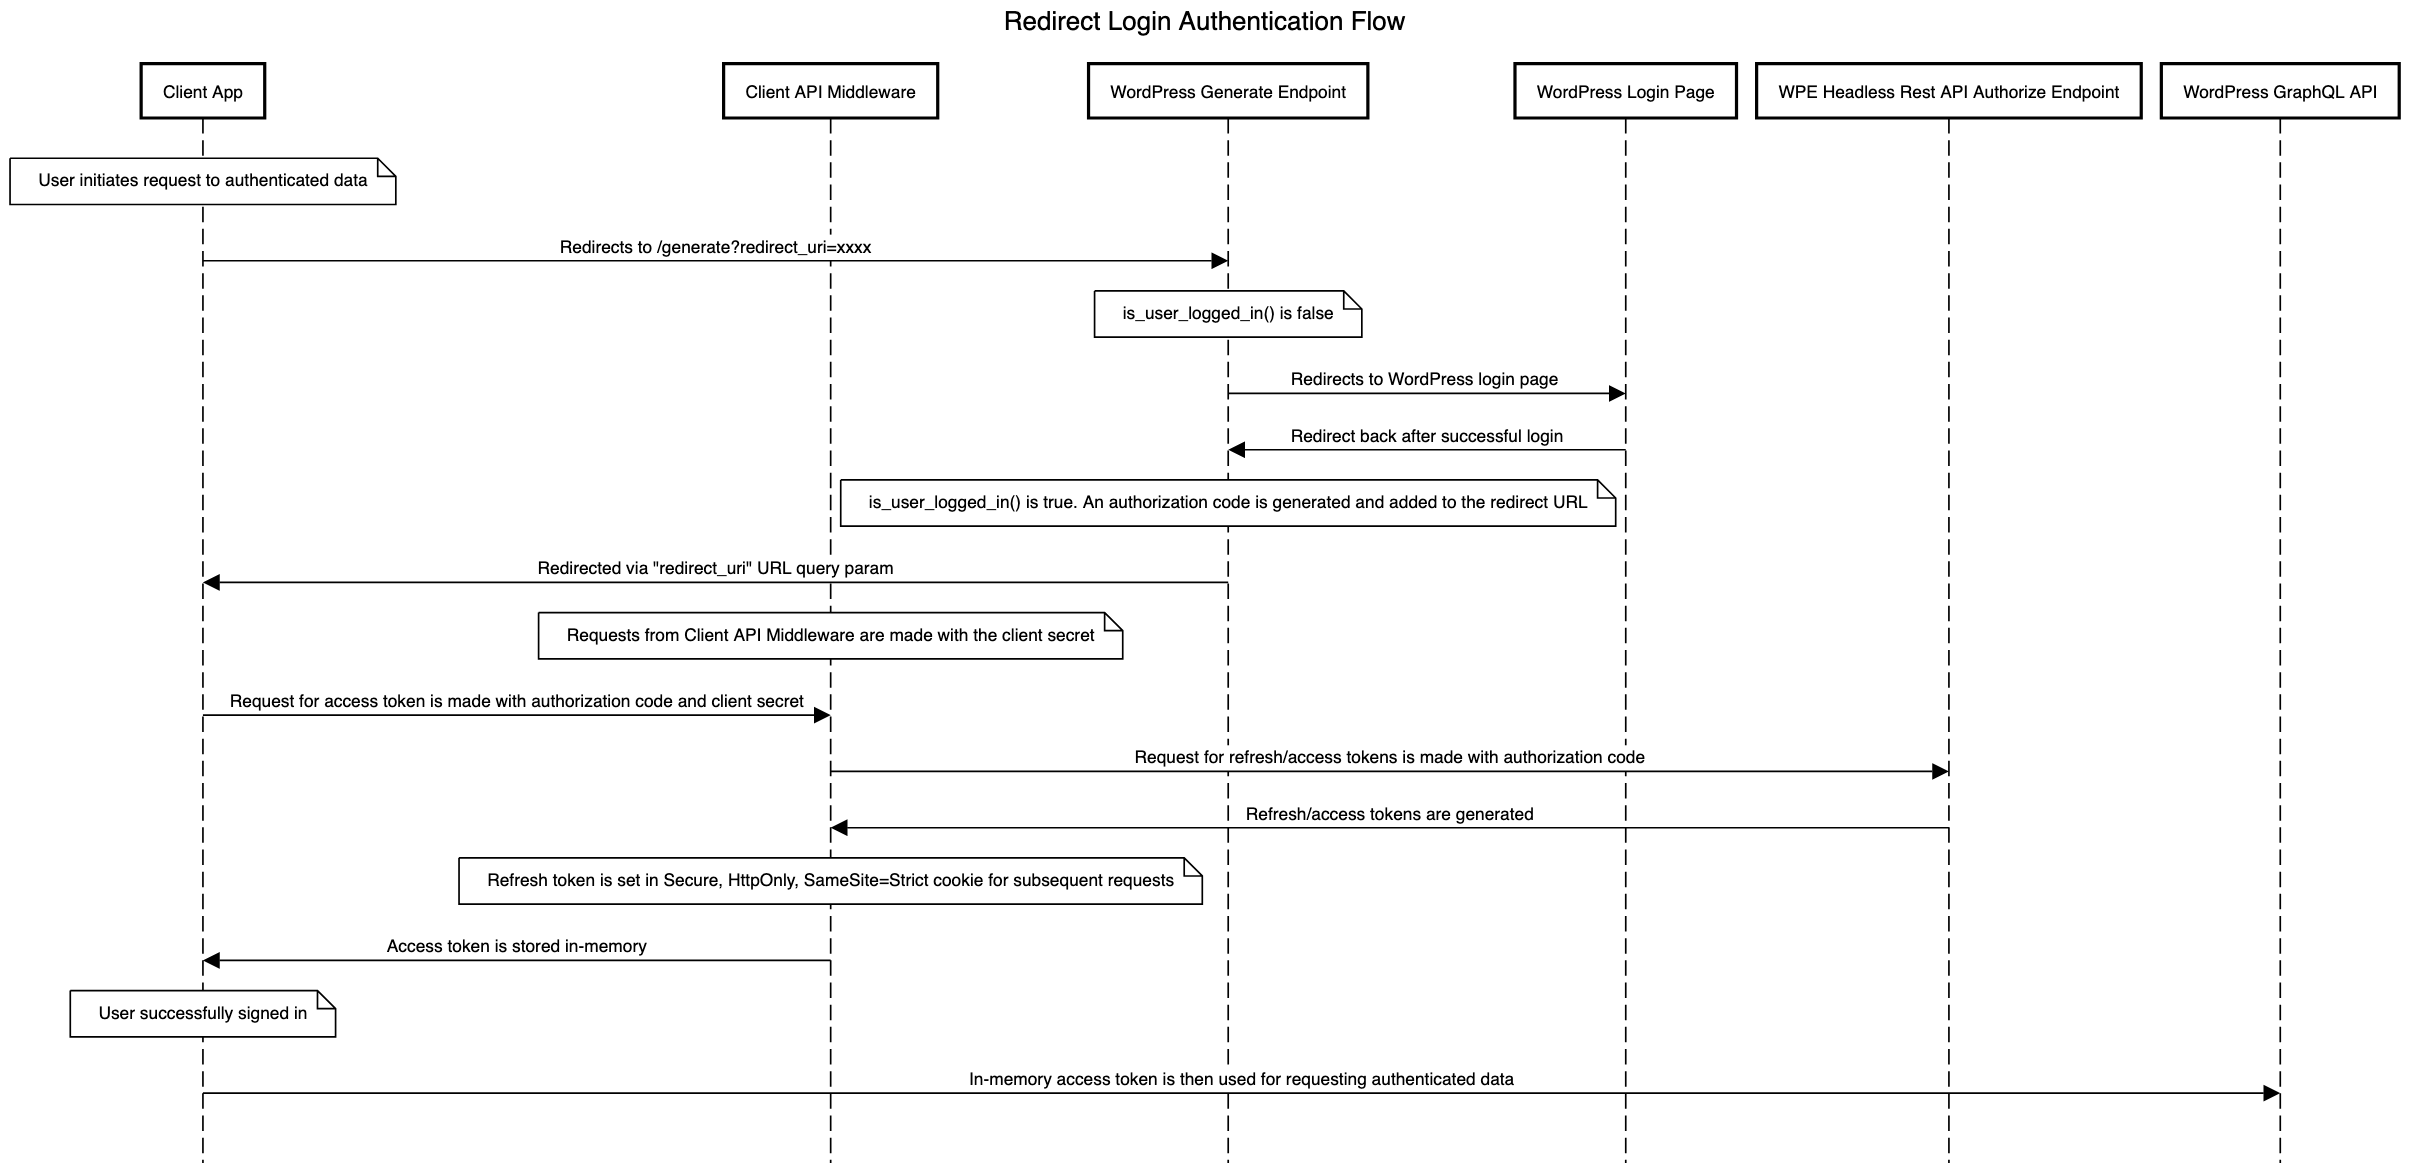
Redirect-based authentication is the default strategy in Faust.js. This strategy involves the user being redirected to WordPress to authenticate. Once the user has shown, the user redirects back to the Next.js application with an authorization code you can then use to request a refresh and access token, thus completing the login process.
This strategy is excellent for use cases where your authenticated users are admins/editors/etc. and do not necessarily need a "white label" login/register experience. Typically, you would use the redirect strategy if your primary reason for authentication is previewing.
Since Redirect based authentication is the default authentication method, there is no configuration needed on your end to use it. It comes out of the box, and you'll see it in action when using previews or the useAuth hook.
Local Based Authentication
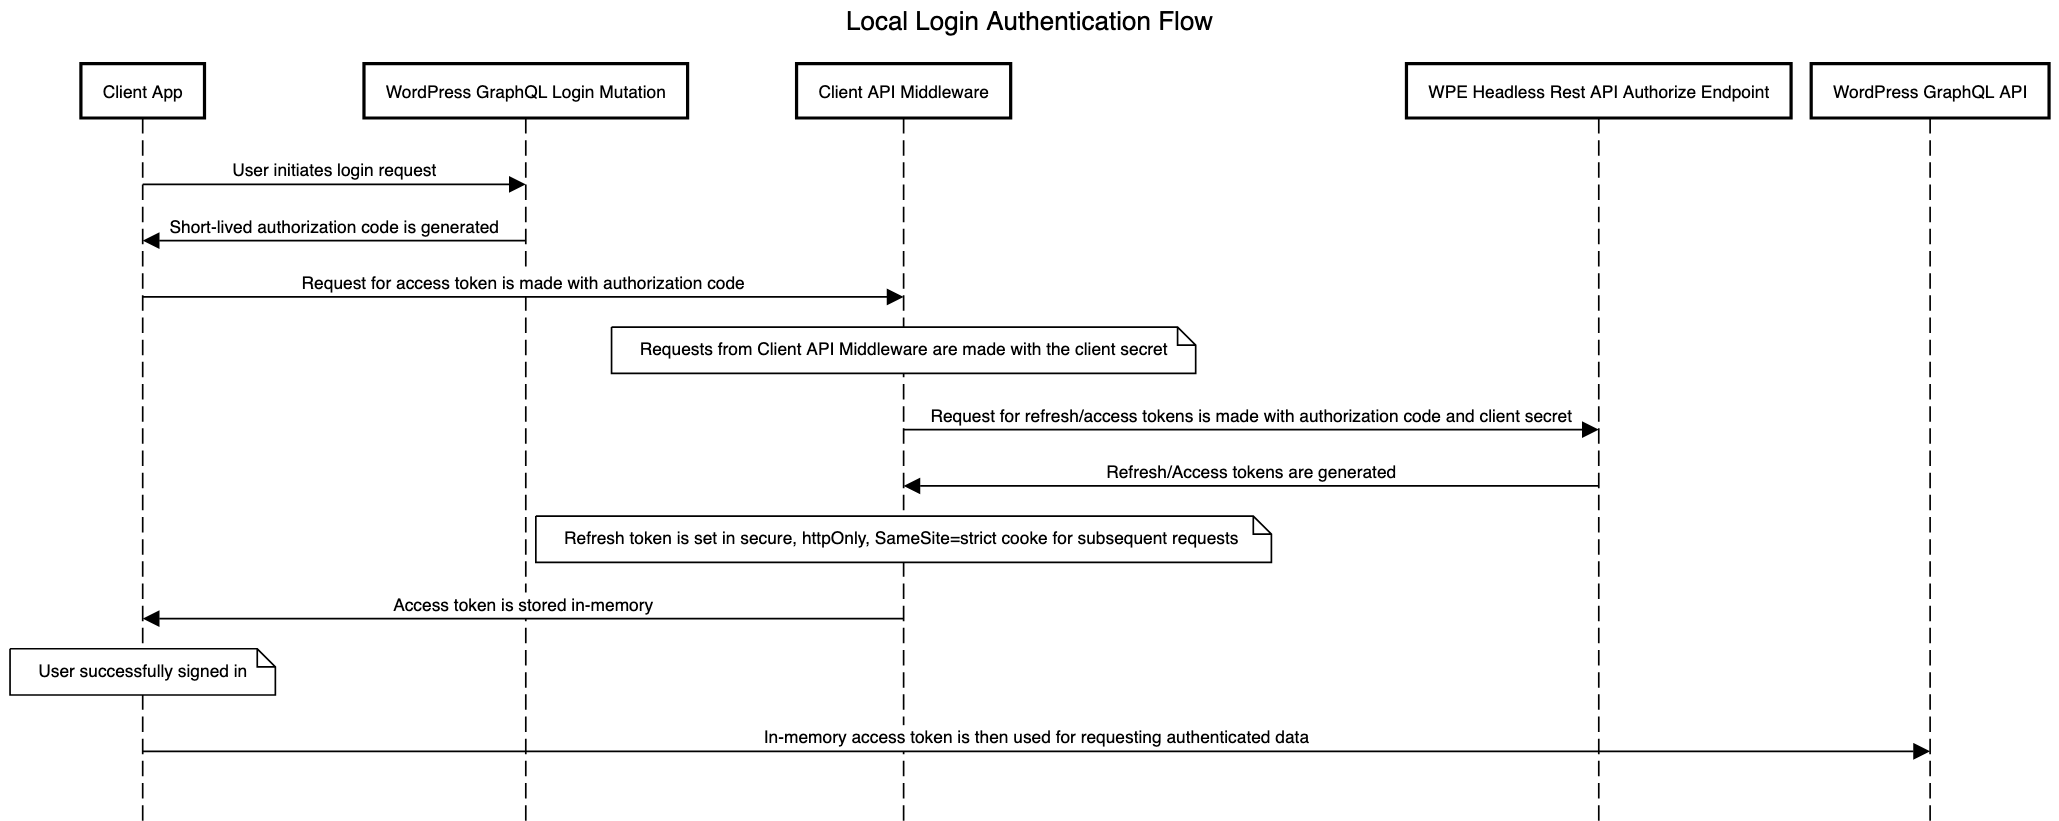
Local Based Authentication is the second strategy available in Faust.js. This strategy involves the user initiating a login request from the Next.js application via the useLogin hook. Upon successful login, useLogin returns an authorization code used to request a refresh and access token, thus completing the login process.
This strategy is excellent for use cases where you want to support a more "white label" login/register experience. This strategy routes un-authenticated requests to your specified Next.js login page. In addition, users who wish to login/register will not have to interact with WordPress or the WordPress backend at all, giving you the flexibility to implement and fine-tune your user flow.
To use this strategy, you'll need to configure your faust.config.js file to use the local authentication strategy, in addition to the route of your Next.js login page. Take the following faust.config.js file, for example:
import { config as coreConfig } from '@faustjs/core';

if (!process.env.NEXT_PUBLIC_WORDPRESS_URL) {
  console.error(
    'You must provide a NEXT_PUBLIC_WORDPRESS_URL environment variable, did you forget to load your .env.local file?',
  );
}

/**
 * @type {import("@faustjs/core").Config}
 */
export default coreConfig({
  wpUrl: process.env.NEXT_PUBLIC_WORDPRESS_URL,
  apiClientSecret: process.env.FAUSTWP_SECRET_KEY,
  authType: 'local',
  loginPagePath: '/login',
});
We define the authType to local to indicate to the Faust.js config that we use the local strategy for authentication. We also describe the loginPagePath to /login to mark the route of the Next.js login page. This strategy redirects unauthenticated requests to the /login route in your Next.js application.
In your login.tsx page, you could take advantage of the useLogin hook to initiate a login request to the WordPress backend:
import { client } from 'client';
import { useState } from 'react';

export default function Login() {
  const { useLogin } = client.auth;
  const [usernameEmail, setUserNameEmail] = useState('');
  const [password, setPassword] = useState('');

  const { login, isLoading, data, error } = useLogin();

  const errorMessage = data?.error || error?.message;

  return (
    <form
      onSubmit={(e) => {
        e.preventDefault();

        login(usernameEmail, password);
      }}
    >
      <div>
        <div>
          <label htmlFor="usernameEmail">Username or Email</label>
        </div>
        <div>
          <input
            type="text"
            value={usernameEmail}
            onChange={(e) => setUserNameEmail(e.target.value)}
            id="usernameEmail"
          />
        </div>

        <div>
          <label htmlFor="password">Password</label>
        </div>
        <div>
          <input
            type="password"
            value={password}
            onChange={(e) => setPassword(e.target.value)}
            id="password"
          />
        </div>

        <div>
          <button type="submit">Login</button>
        </div>
      </div>

      {errorMessage ? <p>Error: {errorMessage}</p> : null}
    </form>
  );
}
The useLogin hook exports an object with the following properties:
login: a function that initiates a request to the WordPress backend for an authorization code that accepts two arguments:usernameEmail, which is either the user's username or email as a string, andpasswordas a string.isLoading: a boolean that indicates whether the login request is in progress.data: the response data from the login request.error: the error from the login request.
For a more detailed explanation of the useLogin hook, see the useLogin hook docs .
Upon successful login, a secure, HTTP only cookie stores a refresh token and the access token in memory for subsequent authenticated requests. You can confirm a login request succeeded by checking for the code property in the data object.
Additionally, if the login page URL contains a redirect_uri query parameter, it will redirect the user to the specified URL upon successful login.
Finally, you can create a logout.tsx page to handle logout requests. This is done by using the useLogout hook:
import { client } from 'client';
import { useRouter } from 'next/router';
import { useEffect } from 'react';
export default function Logout() {
  const router = useRouter();
  const { isLoggedOut, logout } = client.auth.useLogout();
  useEffect(() => {
    if (isLoggedOut !== undefined) {
      return;
    }

    // Initiate the logout process.
    // This could also be called on a button click, for example, in a nav menu.
    logout();
  }, [isLoggedOut, logout]);

  useEffect(() => {
    if (isLoggedOut) {
      // The user was successfully logged out. Redirect them.
      router.push('/');
    }
  }, [router, isLoggedOut]);
  return <>Logging out...</>;
}
The useLogout hook exports an object with the following properties:
logout: a function that initiates a request to the logout middleware to remove the refresh token from the cookie.isLoading: a boolean that indicates whether the logout request is in progress.isLoggedOut: a boolean that indicates whether the logout request was successful.
In this clip, the user clicks on the 'Preview' button in the top right-hand corner of the WordPress site editor. They then select ‘Preview in new tab,’ from a dropdown menu, which takes them to an admin login and password prompt. After entering the login and password, the user can now see a preview of any site edits.
Making Authenticated Requests
In the Faust.js client, you can use useQuery, usePost, usePage, etc., to request the WordPress backend.
These are exported from the client like so:
import { client } from 'client';

export default function Page() {
  const { useQuery } = client;

  return(
    ...
  )
}
Requests using the above methodology will be un-authenticated.
To make authenticated requests, use the auth property exported from the client. This property is essentially a replica of the client, except every request gets called with an access token:
import { client } from 'client';

export default function Page() {
  const { useMutation, usePreview, useAuth } = client.auth;
  const { isLoading, isAuthenticated } = useAuth();

  if (isLoading) {
    return <div>Loading...</div>;
  }

  if (!isAuthenticated) {
    return <div>You are not authenticated!</div>;
  }

  return <div>Authenticated content</div>;
}
Note: The useAuth hook fetches the applicable tokens and ensures that the user is authenticated. Therefore, you should check for isAuthenticated before making authenticated requests, as doing so too early will result in a request without a valid access token.